
When you invest in a dual-monitor setup, you likely picture a sleek, floating workstation that maximizes your desk real estate. However, the reality of setting up two screens often involves a chaotic waterfall of black cords dangling behind your desk. A messy cable situation does more than just ruin your room’s aesthetic; it creates functional hazards. Drooping cords snag on desk edges, pull against the sensitive ports of your expensive computer, and restrict the range of motion of your articulating arms.
If you pull one monitor forward to share your screen or adjust your viewing angle, a tight cable can yank out of its socket, potentially damaging the delicate pins inside a DisplayPort or HDMI connector. Organizing your cables turns a cluttered, frustrating desk into a streamlined, professional environment. As we look toward workspace ergonomics and design trends in 2026, clean and minimalist setups remain the gold standard for boosting productivity and reducing visual clutter. Managing your cables properly is the final, essential step to achieving that professional look.
As an Amazon Associate we earn from qualifying purchases at no extra cost to you. Product prices and availability are accurate as of the date shown and are subject to change.
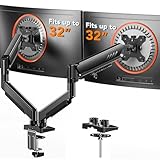
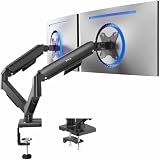
What You Need
Before you begin rerouting your wires, gather the correct tools. Having these items on hand will prevent you from having to stop midway through the process to run to the hardware store.
| Item | Why | Optional? |
|---|---|---|
| Hook-and-loop (Velcro) straps ($5–$12 pack) | Secures cables to the monitor arms without pinching or crushing the internal wires. They are easily adjustable and reusable. | No |
| 10-foot DisplayPort/HDMI cables ($10–$25 each) | Standard 3-foot or 6-foot cables are almost always too short to travel the winding path along articulating arms and down to a PC on the floor. | Highly recommended |
| Neoprene cable sleeves ($10–$18) | Consolidates the bundle of cables dropping from the base of the monitor mount into a single, visually clean tube. | Yes |
| Under-desk cable management tray ($15–$35) | Holds heavy power bricks, surge protectors, and excess cable length off the floor and out of sight. | Yes |
| Adhesive cable clips ($6–$10 pack) | Routes cords flat against the underside of your desktop toward your power source or PC tower. | Yes |
Step-by-Step
Set aside about an hour of uninterrupted time to complete this project. Rushing through cable management often leads to overly tight cords that restrict your monitor’s movement.
Step 1: Mount and Position Your Monitors (Time: 15 Minutes)
Before you even touch a cable, your dual monitor arm mount must be securely clamped or bolted to your desk, and your monitors must be fully mounted. Whether you are using a tool-free VESA system like the ErGear Dual Monitor Arm (designed for 13 to 32-inch screens with a 19.8-pound capacity) or a mechanical articulating option like the VIVO Dual Monitor Stand (STAND-V002O, supporting up to 32-inch screens and 19.8 lbs per arm), ensure the VESA plates are securely fastened. Position the monitors in your ideal, everyday working layout. If you use a sit-stand desk, raise the desk to its highest standing height to ensure your cables will be long enough when the desk is fully extended.
Step 2: Connect and Assess Cable Length (Time: 10 Minutes)
Plug your power cables and video cables (HDMI or DisplayPort) into the back of your monitors. Do not plug them into the computer or power outlet just yet. Let the cords hang loose. This is the moment to verify if your cables are long enough. A standard 6-foot cable is rarely sufficient because the routing path down a dual monitor arm, along the desk frame, and down to the PC can easily consume 8 feet of length. If your cords are taut when hanging straight down, swap them out for 10-foot or 12-foot versions before proceeding.
Step 3: Route Through the Built-In Channels (Time: 15 Minutes)
Most modern articulating mounts, including options from ErGear and VIVO, feature built-in cable management. This usually consists of plastic snap-on clips along the upper and lower arm segments, or hollow channels integrated into the metal structure itself.
Starting at the back of the monitor, push the cables into the upper arm clip. Leave a small loop of slack (about 2 to 3 inches) between the VESA plate and the first clip. This loop is critical; it allows the monitor to tilt and rotate without pulling on the ports. Run the cables down to the elbow joint of the arm, leaving another small loop of slack at the joint so the arm can fold and extend smoothly. Finally, route the cables through the lower arm channel down to the central pole or base clamp.
Step 4: Secure with Hook-and-Loop Straps (Time: 10 Minutes)
If your monitor arm does not have built-in channels, or if you have extra cords (like a USB cable for a webcam or a desk light bar), you will need to use hook-and-loop (Velcro) straps. Wrap a strap around the upper arm segment, securing the cables snugly but not too tightly. Place another strap just before the elbow joint, and a third strap on the lower arm segment. Avoid using plastic zip ties here, as they cannot be adjusted easily if you decide to swap out a cable later, and they can easily cut into thin wire insulation if over-tightened.
Step 5: Bundle and Conceal the Drop-Down (Time: 10 Minutes)
Once all cables from both monitors reach the central base of the mount, you will have a bundle of at least four cords (two power, two video). Wrap this entire bundle together from the base of the mount down to the desktop level. For a highly polished look, slide this bundle into a zippered or self-wrapping neoprene cable sleeve. This turns a messy group of multicolored wires into a single, clean black or white column that blends in with your monitor stand.
Step 6: Route Under the Desk (Time: 10 Minutes)
Now that the cables have cleanly reached your desktop, guide them to their final destinations. Mount an under-desk wire tray or basket to the underside of your desk. Place your power strip and any heavy monitor power bricks inside this tray. Use adhesive cable clips to route the video cables along the underside of your desk frame directly to your PC tower. Plug everything in, turn on your system, and test the full range of motion of your monitor arms to ensure nothing catches or pulls tight.
Mistakes to Avoid
- Pulling the cables too tight at the joints: This is the most common mistake. Always test the tilt, swivel, and rotation of your screens after securing each section. If a cable pulls taut, loosen the nearest strap or clip to add more slack.
- Using plastic zip ties: Zip ties are permanent and have sharp edges when cut. If you need to replace a failing HDMI cable, you will have to carefully cut away every zip tie, risking damage to your other cords. Stick to reusable hook-and-loop straps.
- Ignoring power brick weight: Heavy power bricks should never hang freely from the back of your monitor or the edge of your desk. The constant downward pull can damage the power port on your monitor or cause the plug to slip out. Secure these bricks inside an under-desk tray.
- Routing power and data cables too closely over long runs: While modern shielded cables are highly resilient, running unshielded, low-quality video cables tightly parallel to high-voltage power lines for several feet can occasionally introduce electromagnetic interference, leading to screen flickering. Keep them bundled neatly, but buy high-quality, shielded cables to prevent signal issues.
How Often
Cable management is not strictly a “one-and-done” task. You should inspect your setup every 6 to 12 months. Over time, adjusting your monitors can slowly pull slack out of the joints, causing cables to become taut. Additionally, dust tends to accumulate around bundled cables and inside under-desk trays, which can create a minor fire hazard or cause components to run warm. Take a few minutes twice a year to wipe down the cords, check the tension at the articulating joints, and ensure all adhesive clips remain firmly attached to the underside of your desk.
When to Call a Pro or Replace
While cable management is a straightforward DIY project, there are times when you should replace your gear or consult a professional.
If you notice any exposed copper, fraying insulation, or severe kinks in your power or video cables, replace them immediately to avoid electrical shorts or port damage. If your monitor arm’s built-in plastic routing clips crack or snap, do not buy a whole new mount; simply switch to hook-and-loop straps to secure the wires.
However, if you upgrade your screens to models that exceed the weight capacity of your current mount (for example, upgrading from standard screens to heavy 34-inch ultrawide monitors that exceed a 19.8-pound limit), you must replace the arm mount itself with a heavy-duty option (typically ranging from $80 to $200) to prevent your screens from sagging or falling.
Finally, if you want a completely wireless look that involves routing power lines behind your drywall, you should hire a licensed electrician. Running standard power cords through walls violates most local building codes; a professional can install an in-wall cable routing kit or a code-compliant recessed outlet behind your desk setup.
FAQ
Why do my monitors flicker or lose signal when I adjust my dual monitor arm?
This is almost always caused by a lack of cable slack. When you move the arm, the cable pulls tight, slightly dislodging the connector from the port on your monitor or PC. Even a millimeter of movement can interrupt the digital signal. Inspect your connections and add a 2-inch loop of slack at each joint of the monitor arm.
Can I manage cables effectively on a standing desk?
Yes, but it requires extra care. You must raise your desk to its absolute maximum height before organizing your cables. This ensures your drop-down cable bundle has enough slack to reach the wall outlet when the desk is fully extended. Use a flexible cable spine or a braided sleeve to keep the rising bundle neat and protected from pinching in the desk’s lifting mechanisms.
Are the built-in cable clips on budget monitor arms durable?
Many budget-friendly dual monitor mounts (in the $30 to $50 range) use plastic snap-on clips to manage cables. While these are highly functional, the plastic can become brittle over time. If a clip breaks, you do not need to replace the entire mount. Simply use black hook-and-loop straps wrapped directly around the metal arms; they work just as well and are far more durable.
How do I hide the cables if my desk is in the middle of the room?
If your desk does not face a wall, you cannot easily hide the cables behind the desktop. In this scenario, route all cables down the monitor arm to the central pole. Run the bundle straight down the pole using a matching sleeve, and guide it down one of the desk legs using adhesive clips or magnetic cable guides. From the foot of the desk leg, use a low-profile floor cord protector to safely run the cables to the nearest wall outlet without creating a tripping hazard.
