
The excitement of unboxing a massive, high-end ultrawide monitor or a dual-screen productivity setup is unmatched. However, that excitement can quickly turn to dread when you clamp on a cheap monitor arm, release your grip, and watch your expensive display slowly droop, face-planting directly onto your desk.
When dealing with displays that weigh 20, 30, or even 50 pounds, a standard monitor stand will not cut it. Many buyers make the mistake of choosing a mount based solely on the advertised screen size capacity, completely ignoring weight distribution, desk material strength, and tilt joint mechanics. To help you avoid a costly disaster, this guide outlines exactly what to check before buying heavy monitor arm mount setups that actually keep your screens safe, stable, and perfectly positioned.
As an Amazon Associate we earn from qualifying purchases at no extra cost to you. Product prices and availability are accurate as of the date shown and are subject to change.
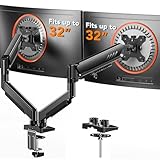


Top 3 picks at a glance
Decide These 3 Things First
Before you start browsing online catalogs or comparing prices, you must evaluate your current desk environment. Skip these three preliminary checks, and even a premium $300 industrial-grade mount could fail.
- Your Desk’s Material and Structural Integrity: A heavy monitor mount concentrates a massive amount of downward and rotational force onto a very small surface area (usually a 4×4-inch clamping plate). If your desk is made of hollow-core honeycomb paper (like many cheap flat-pack desks), particleboard, or glass, the clamp can literally crush or shatter the desktop under the weight of a heavy display. Solid wood, thick plywood, and heavy-gauge steel-framed desks are the safest foundations.
- The Net Weight of Your Monitor (Without the Stand): Manufacturers list “shipping weight” or “product weight with stand.” You must find the weight of the monitor panel alone. This is the exact load the arm will bear. For example, a 49-inch curved ultrawide might weigh 45 pounds in the box, but only 33 pounds once you strip away its factory metal stand.
- Your Adjustability Needs (Static vs. Dynamic): Ask yourself how often you will move the screen. If you share a desk or switch between sitting and standing throughout the day, you need a dynamic gas spring or mechanical spring arm. If you plan to set the screen once and rarely touch it, a heavy-duty, lockable pipe/pole-style mount is more stable and often more budget-friendly.
Weight Capacity and Curved Screen Leverage
The most critical specification to check is the maximum weight capacity, but you must look beyond the raw numbers. Standard budget single-arm mounts, such as basic entry-level options priced around $26.99, generally top out at 19.8 pounds and are designed for flat screens between 13 and 34 inches.
As we move into 2026, the trend toward massive, deeply curved ultrawide monitors (like 1000R or 1800R curves) completely changes the physics of monitor mounting. A curved screen projects its center of gravity forward, away from the mounting plate. This creates a leverage effect. A 30-pound curved monitor puts as much stress on the arm’s tilt joint as a 45-pound flat screen. If you are mounting a heavy curved monitor, such as a 49-inch display weighing close to 30 or 40 pounds, look for specialized heavy-duty mounts rated up to 55 pounds, which typically retail around $102.99. Always leave a safety buffer of at least 10% between your monitor’s net weight and the arm’s maximum rated capacity.
Desk Attachment Mechanics and Clamp Depth
How the mount connects to your desk determines whether your setup stays upright or wobbles every time you type. You have two primary options: C-clamp and Grommet mount. Most heavy-duty arms include hardware for both, but you must verify the dimensions.
For C-clamps, check the maximum desk thickness capacity. Standard clamps accommodate desks from 0.4 inches up to 3.3 inches thick. More importantly, check the required clearance under the desk. Many desks have steel support beams running right along the back edge; if this beam is within 2 inches of the edge, a standard C-clamp may not be able to bite onto the flat wood surface. If your desk has an obstruction, you will need to drill a hole and use a grommet mount, which secures the arm using a heavy-duty bolt threaded directly through the desktop.
Material and Construction Quality
When supporting heavy loads, plastic is your enemy. Cheap mounts rely heavily on plastic shrouds, thin pressed-steel plates, and low-grade aluminum castings that can bend under sustained tension.
A true heavy-duty monitor arm should be constructed primarily from die-cast aluminum alloys and heavy-gauge structural steel. Look closely at the elbow joints and the desk clamp assembly. These should be solid, heavy metal pieces. Pay attention to the adjustment mechanism. Gas spring (pneumatic) arms use pressurized gas cylinders to counterbalance the monitor’s weight, allowing for effortless, finger-tip adjustments. Mechanical coil spring arms are slightly stiffer to adjust but are incredibly durable and do not lose tension over time like cheap gas cylinders can.
VESA Compatibility and Quick-Release Plates
The Video Electronics Standards Association (VESA) standard defines the hole pattern on the back of your monitor. Most screens up to 32 inches use a 75x75mm or 100x100mm VESA pattern. Budget single and dual monitor arms (ranging from $26.99 to $34.99) almost always feature these standard configurations.
However, extremely large or heavy monitors (ranging from 35 to 57 inches) sometimes utilize larger 200x100mm or 200x200mm patterns, or require custom proprietary bracket adapters. Before purchasing, look at the back of your monitor and measure the distance between the screw holes. Furthermore, look for a mount that features a quick-release or slide-in VESA plate. Trying to hold a 35-pound monitor perfectly still with one hand while trying to line up and thread tiny screws with the other is incredibly difficult and dangerous. A quick-release plate allows you to screw the bracket onto the monitor while it is safely face-down on a bed, then simply slide and click the monitor onto the pre-installed arm.
Price Tiers and What They Buy You
Understanding price tiers helps align your expectations with reality. The monitor mount market is generally divided into three distinct brackets:
- Budget ($25 – $45): Excellent for standard setups. In this tier, you will find highly adjustable single and dual monitor arms (supporting up to 19.8 pounds per arm) that are perfect for screens up to 32 or 34 inches. They are great for standard office work but will sag under heavy ultrawides.
- Mid-Range ($50 – $90): This is the sweet spot for entry-level ultrawides. For around $56.99, you can find solid aluminum heavy-duty mounts rated for screens up to 49 or even 57 inches, provided they stay under a 30-to-35-pound weight threshold. Construction shifts from thin steel to robust aluminum alloys.
- Premium ($100 – $300+): Essential for extreme setups. If you own a 49-inch curved gaming monitor weighing over 30 pounds, you must shop in this tier. Heavy-duty options around $102.99 and up feature heavy-duty tilt mechanisms, reinforced pivot joints, and heavy steel clamps designed specifically to handle the extreme torque of deep-curve displays.
Cable Management and Extension Range
Heavy monitors require heavy-duty cabling. A thick power cable, high-bandwidth DisplayPort cables, and USB upstream cords quickly create a heavy, stiff bundle.
Check the design of the arm’s integrated cable management channels. Cheap mounts use flimsy plastic clips that snap off under the pressure of thick cables. Premium mounts feature spacious, screw-secured routing channels or magnetic covers built directly into the aluminum arm segments. Additionally, check the maximum reach (extension) and vertical lift. A heavy arm should offer at least 20 inches of horizontal extension and 13 inches of height adjustment, allowing you to push the massive screen back far enough to maintain a healthy viewing distance.
Spec Checklist
Use this quick-reference matrix to evaluate different tiers of heavy monitor arm mounts based on your specific setup requirements:
| Feature / Spec | Budget Tier ($25 – $45) | Mid-Range Tier ($50 – $90) | Premium Tier ($100+) |
|---|---|---|---|
| Max Weight Capacity | 15 to 19.8 lbs | 20 to 35 lbs | 35 to 55+ lbs |
| Max Screen Size | Up to 32″ (Flat) | Up to 35″ (Curved) / 40″ (Flat) | 49″ to 57″ (Deep Curved) |
| Primary Materials | Steel & Plastic | Die-cast Aluminum | Reinforced Steel & Premium Alloys |
| Tilt Tension Adjustment | Basic Bolt (Requires Hex Key) | Spring-assisted Tension Bolt | Heavy-Duty Torque Tilt Joint |
| Desk Thickness Range | 0.4″ to 3.0″ | 0.4″ to 3.1″ | 0.4″ to 3.5″ (Heavy-Duty Clamp) |
| VESA Options | 75×75, 100x100mm | 75×75, 100×100, 200x100mm | 75×75 up to 200x200mm (with adapters) |
Red Flags to Watch Out For
When shopping for a heavy-duty mount, keep an eye out for these warning signs that indicate a product might not be up to the task:
- Vague “Universal” Claims: Avoid listings that claim to support “all monitors” without explicitly stating a maximum weight capacity in pounds or kilograms.
- No Tilt-Tension Adjustment Screw: If the joint directly behind the VESA plate does not have a massive, adjustable hex bolt to tighten the tilt mechanism, the arm will not be able to hold a heavy monitor level; it will slowly droop downward.
- Thin, Single-Bolt Desk Clamps: Heavy-duty mounts require a wide C-clamp base, preferably with dual fastening bolts or a wide pressure-distribution plate to prevent desk damage and wobbling.
- Short Warranty Periods: A manufacturer that only offers a 90-day or 1-year warranty on a “heavy-duty” mount likely uses low-grade gas cylinders that may fail prematurely. Look for warranties of 3 to 5 years.
FAQ
Can I mount a heavy monitor on a glass desk?
Generally, it is highly discouraged to clamp a heavy monitor arm directly onto a glass desk. The concentrated clamping pressure can cause the glass to shatter instantly. If you must do it, you should use a heavy-duty steel reinforcement plate on both the top and bottom of the glass to distribute the force, and ensure the desk is made of thick, tempered glass. Even then, a grommet mount or a wall mount is a much safer alternative.
What is the difference between a gas spring and a mechanical spring monitor arm?
Gas spring arms use a pressurized gas cylinder to assist with height adjustments, offering incredibly smooth, effortless, fluid motion. However, the gas seals can degrade over several years, eventually causing the arm to lose tension. Mechanical coil springs use heavy steel springs; they require slightly more physical effort to adjust but are virtually indestructible and will maintain their tension indefinitely.
Why does my monitor tilt downward even though the arm is rated for its weight?
This is almost always due to the tilt-tension joint not being tightened enough. Heavy monitors, especially curved ones, create high rotational torque on the hinge directly behind the screen. You must locate the heavy hex bolt at the very top pivot joint of the arm and tighten it clockwise (often requiring significant force) until the screen remains locked at your desired viewing angle.
Do I need a special adapter for a curved ultrawide monitor?
Some curved ultrawides have a deep, recessed VESA mounting area on the back. While standard flat VESA plates won’t fit inside these recesses, most monitors include a metal spacer ring or adapter bracket inside their original packaging. Always check your monitor’s box for these adapters before buying a mount, and ensure your chosen mount’s VESA plate is slim enough to fit the adapter profile.

