The best guitar capos are the ones that apply enough pressure to hold every string cleanly without pulling notes sharp, and the right choice depends mainly on your guitar’s neck profile, fretboard radius, and whether you need fast one-handed changes.
As an Amazon Associate we earn from qualifying purchases at no extra cost to you.


Our Top Picks
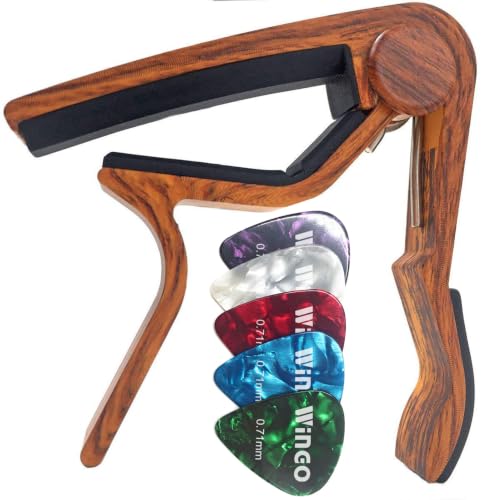 WINGO Guitar Capo for Acoustic Electric Guitars-Rosewood Colorsingel-handed capo3.2 x 3.1 x 0.47 inches0 poundsCheck on Amazon
 Kyser Quick-Change Guitar Capo for 6-string acoustic guitars4 x 3.25 x 0.5 inches0.01 poundsCheck on Amazon
 Htaexpu Guitar Capo for Acoustic and Electric GuitarSmall3.39 x 2.95 x 0.59 inches0.09 poundsCheck on Amazon

Top 3 picks at a glance
Quick recommendations by guitar and playing style
| Guitarist’s situation | Best capo type | Good model examples | Why it fits |
|---|---|---|---|
| Steel-string acoustic, frequent key changes | Spring clamp | Kyser Quick-Change, Dunlop Trigger 83 | Fast to move between songs and simple to operate |
| Acoustic guitar with noticeable tuning sensitivity | Screw-adjusted clamp | Shubb C1, D’Addario NS Tri-Action | More controlled tension reduces sharp notes and fret buzz |
| Electric guitar with a thin or compound-radius neck | Low-profile screw or controlled spring design | G7 Performance 2, D’Addario NS Tri-Action | Better clearance and finer adjustment than a heavy clamp |
| Classical guitar with a flat, wide fretboard | Wide, adjustable capo | Shubb C2 or a comparable classical-guitar model | Reaches the outer strings without excessive central pressure |
| Beginner who prioritizes convenience | Spring clamp | Kyser Quick-Change or Dunlop Trigger 83 | Easy to attach, remove, and store on the headstock |
Spring versus screw tension
Spring capos: quickest, but less adjustable
Spring capos use a clamp mechanism that applies a preset amount of pressure. Models such as the Kyser Quick-Change and Dunlop Trigger 83 are popular because they can be moved with one hand while holding the guitar.
The trade-off is that the spring may apply more force than your guitar needs. Excess pressure stretches the strings sideways and raises their pitch, especially on lighter acoustic strings or an electric guitar with low action. A spring capo can also create buzz if its rubber pad does not sit evenly across a strongly curved fretboard.
Spring tension is a good choice when you change keys often, play live, or want the simplest possible operation. Before a performance, place it just behind the fret rather than directly over the metal fretwire. That position normally requires less force and reduces the chance of sharp notes.
Screw capos: slower, but more precise
Screw-adjusted capos let you increase pressure gradually until each string rings clearly. The Shubb C1 uses a lever-and-screw approach, while the D’Addario NS Tri-Action and G7 Performance 2 provide more controlled adjustment in compact designs.
This extra control matters on guitars with low action, light strings, or sensitive intonation. Instead of clamping as hard as possible, tighten until the lowest and highest strings ring cleanly, then stop. A screw capo takes a few seconds longer to install, but that adjustment can prevent the need to retune every time you change position.
Screw models are usually the better option for recording, fingerstyle playing, and guitars that frequently sound sharp when a spring capo is attached. They are also useful when two guitars have different neck thicknesses and you want one capo to work on both.
Pad material and shape: the parts touching your guitar
The pad should protect the strings and fretboard while distributing pressure evenly. Most quality capos use silicone, rubber, or a soft synthetic elastomer. The exact brand name matters less than the pad’s softness, width, and ability to remain aligned with the fretboard.
- Soft silicone or rubber: conforms well to the fretboard and is gentle on finishes, but can compress or wear over time.
- Firm rubber: lasts well and gives stable contact, but may need more careful positioning on a radiused fretboard.
- Narrow pads: keep the capo lightweight and reduce obstruction, but may expose more variation between strings.
- Wide pads: work well on classical and wide acoustic necks, provided the capo can apply even pressure from bass to treble.
A pad that is too hard can leave marks or fail to accommodate a curved fretboard. A pad that is too soft can sink around the strings and require excessive clamp force. Inspect the contact surface occasionally for dents, cracks, or hardened areas; an uneven pad is a common cause of intermittent buzz.
Neck-profile and fretboard-radius fit
Capos do not fit every neck in the same way. Acoustic guitars commonly have a noticeable fretboard radius, while classical guitars are much flatter. Electric guitars can range from relatively round vintage-style boards to flatter modern compound-radius designs.
Measure the neck at the fret where you normally place the capo, including the fretboard edges but not the back of the neck. Also check the capo’s usable opening. A capo that barely reaches around the neck may lose pressure when moved toward the wider first few frets.
| Typical fretboard radius | Common guitar type | Recommended capo behavior | Risk if poorly matched |
|---|---|---|---|
| Flat to approximately 12 inches | Classical and many acoustic guitars | Wide pad with adjustable or moderate tension | Outer strings buzz if the center is clamped much harder |
| Approximately 9.5 to 12 inches | Many modern electric guitars | Low-profile capo with even, restrained pressure | Over-clamping pulls notes sharp |
| Approximately 7.25 to 9.5 inches | Some traditional electric guitars | Flexible pad that follows a pronounced curve | Middle strings ring while outer strings buzz, or vice versa |
| Compound radius | Many performance-oriented electrics | Adjustable tension and a pad that can conform across the neck | One fret position works while another does not |
How to install a capo without fret buzz
- Check the guitar first. Tune the open strings and play each one at low volume. If the guitar already buzzes without a capo, the capo is not the underlying repair.
- Place the capo just behind the fret. Leave roughly 2–5 mm between the capo’s edge and the fretwire. This lets the fret act as a firm termination point and usually needs less pressure.
- Center the pad. Make sure it runs parallel to the fret rather than sitting at an angle. On a radiused neck, the pad must contact the bass and treble strings evenly.
- Use the minimum effective tension. For a screw model, tighten in small increments. For a spring model, choose the lightest suitable capo and avoid placing it farther from the fret than necessary.
- Play every string at the capoed fret. Pick gently, then use your normal attack. Listen for muted notes, rattling, or a pitch that jumps noticeably sharp.
- Retune after installation. A little correction is normal, especially on an acoustic guitar. If several strings go substantially sharp, reduce pressure or move the capo closer to the fret.
Worked example: finding excessive capo pressure
Suppose your open high E string is tuned to 329.6 Hz. After attaching a capo, it reads about 333 Hz. That is approximately a 19-cent increase, calculated with 1200 × log2(333 ÷ 329.6). A small change of a few cents may be acceptable, but 19 cents is clearly audible in a chord.
Move the capo directly behind the fret and reduce its tension if adjustable. If the note still rises sharply, the capo may be too strong for the guitar’s action or string gauge. A lower-pressure screw model is more appropriate than trying to force the existing spring clamp into working.
Model-specific strengths
Shubb C1 and C2
The Shubb C1 is designed for many steel-string acoustics, while the wider C2 is intended for classical-style necks. Their adjustable mechanism makes them useful when tuning stability matters more than instant changes. They are especially suitable for players who want controlled pressure and a compact profile.
Kyser Quick-Change
The Kyser Quick-Change is a familiar spring-clamp design with fast one-handed operation. It suits rehearsals, live sets, and beginners who want to move a capo quickly. Because its tension is preset, placement is particularly important on low-action electric guitars.
Dunlop Trigger 83
The Dunlop Trigger 83 uses a spring mechanism and is easy to reposition. It is a practical general-purpose choice for many steel-string acoustics. Check the opening and pad alignment if your neck is unusually thick, wide, or strongly radiused.
D’Addario NS Tri-Action
The D’Addario NS Tri-Action is a compact adjustable capo aimed at reducing unnecessary pressure and obstruction. Its low-profile shape makes it attractive for electric guitar and recording setups where access to the fretting hand matters.
G7 Performance 2
The G7 Performance 2 is a premium adjustable design focused on controlled clamping and quick operation. It can be a strong choice for players who use multiple guitars with different neck shapes and want more precision than a basic spring capo provides.
Frequently asked questions
Can one capo work on more than one guitar?
Yes, a screw-adjusted capo is usually the more adaptable choice when two guitars have different neck thicknesses. Its tension can be increased gradually until the strings ring clearly, rather than relying on one preset spring force. You should still check the usable opening, pad alignment, neck width, and fretboard radius on each guitar.
Should I put the capo on the first fret or farther up the neck?
You can place it at any required fret, but position it just behind the fretwire rather than directly over the metal fret. Leave roughly 2–5 mm between the capo’s edge and the fretwire. This normally requires less pressure and can reduce sharp notes, muted strings, and fret buzz.
How do I know whether a capo is suitable for a classical guitar?
Look for a wide pad and enough adjustable or moderate tension to reach the outer strings evenly across the flatter, wider fretboard. The Shubb C2 is intended for classical-style necks. A capo that clamps the center much harder than the edges can leave the outer strings buzzing.
Why does my guitar sound sharp after I attach a capo?
The capo may be applying more pressure than the guitar needs, stretching the strings sideways and raising their pitch. This is more noticeable with lighter acoustic strings, low action, or an electric guitar. Move the capo just behind the fret, reduce tension if possible, and retune after installation.
When should I inspect or replace the capo’s pad?
Inspect the contact surface when you notice intermittent buzz or uneven pressure, and look for dents, cracks, or hardened areas. An uneven pad can cause buzzing, while a pad that is too hard may not accommodate a curved fretboard. Soft pads can also compress or wear over time and require more clamp force.
Final buying checklist
- Choose a spring capo for speed and a screw-adjusted capo for tuning control.
- Match the capo width to the guitar’s nut and fretboard, not merely to its category.
- Prefer a compliant pad that follows the fretboard radius without folding around the strings.
- For electric guitar, prioritize low profile and light, adjustable tension.
- For classical guitar, choose a model specifically wide enough for the flat fretboard.
- If a capo causes repeated sharp notes or buzz, change its position and pressure before buying heavier strings or adjusting the truss rod.
The best guitar capos do not need to feel powerful; they need to be predictable. A correctly fitted pad, restrained tension, and placement just behind the fret will usually do more for clean chords than a stronger clamp.